Friday, November 15, 2013

Evolution of a Design/er


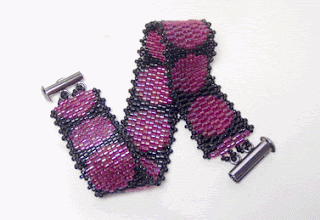
In 2011, I made this bracelet from a Fusion Beads kit called Peyote Ruffle. I loved the colours and always had it in mind to do another one, but to really make it my own this time around. If I want to call myself a designer, well then I'd better get designing...


For the first time, I laid out my own peyote stitch pattern using computer software called Easy Bead Patterns. To make things go easier, I decided to try a 2-drop peyote stitch - not entirely a "first", but my first time doing 2-drop for an entire bracelet. However, because I wanted a symmetrical pattern, I had to go with odd count peyote, meaning an odd number of columns. Not so easy now! I went with the traditional method of odd count where you do a turn-around within the beads at the end of every other row. The tension was off a bit, so another time I'd like to try a different method.


Here it is...


Welcome to "Razzle Dazzle Dots"! I decided not to do the ruffle like in the kit, to keep the lines more simple. I also found out that it was much easier when adding the picots to go down and up two beads instead of trying to go through one bead. Of course I didn't figure this out until part way through. I decided not to go back, so the second edge went easier and I just hope that no one, except me, notices the difference!

I used the same clasp, a gun metal plated sliding tube because it is so easy to use and the colour works well with the beads.

The bracelet isn't perfect, but I'm very proud of my progress.


Saturday, November 9, 2013

Back After a Short Hiatus

I'm back. I can't say that I was very productive since my last post, but I can say that I'm definitely ready for my next creative spurt.  I now have a counter top display unit for my jewelry.

I got very discouraged last year after finding a very friendly venue for my work here in London, but then having several items stolen. Unfortunately, I had to make the decision not to show there any more. The solution seemed to be some sort of glass cabinet that could limit access, preferably be lockable, but still display my jewelry to its best advantage. Easy. Not. These cabinets only seem to be available through specialty display companies and are very pricey. I would also have to factor in shipping costs which could be steep. I even sought out my handy hubby, but nothing came readily to mind.

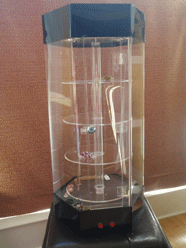
Finally, after an unexpected monetary gift and a serendipitous email sales flyer, I was able to purchase what I needed. Here is my new "showcase" from Zakka Canada:


I chose this one first of all because it was lockable. It also has a light and enough shelves, four, to display a good variety of my work. (Or some nice sea shells, which is mostly what I have at the moment!) It also rotates automatically which wasn't a requirement and I'm not sure if I'll use this feature because it seems a little noisy. We'll see.

Next I need a display solution for Grenada. I have a marina who graciously offered to show my jewelry, but they would prefer to have a cabinet that could be locked.  I saw some that I liked at a booth at one of the antique shows at Cherryhill Mall.  They were made from wood with a glass cover that could sit open at an angle. After buying some beads and vintage jewellery, I asked the owner where she got her cases. It turned out that her husband made them. I already carry about 50 lbs. of beading supplies when I travel, so I'd need to have them made in Grenada. (Right, dear?!) So Scott Bell, of Rush Creek Renovation in St. Thomas has promised to do up some plans for me. Wood, glass, hinges and a lock should be easy enough to obtain once we're in Grenada, or a trip to Lee Valley may be warranted. There are some better photos on his Facebook page, but it will look something like this:


Now all I have to do is make some goodies to fill 'em up!
Wednesday, April 24, 2013

New Jewelry to brag, ahem, I mean tell you about...

Last year I made a bracelet that I just loved. It was a spiral rope with a combination of olive and khaki beads. Unfortunately, or fortunately, it sold. I've finally made another one to sell and this time made one for me. I've been learning more wire work, so the clasps are fancier, with a spiral of course. I'm working on a new business card and logo. I call it the "Signature Selinger Spiral". Also, Adobe Illustrator has a cool spiral tool, so I've been fooling around with that. Then I can attach little wire spirals to my jewelry so that you know it is a genuine Fran Selinger product.

The first bracelet is, logically, the first one I made. The second is the one that I have made to sell, and the third one (no pic yet) is mine, all mine. For it I used matte instead of metallic cylindrical beads. In any event, I have a feeling that the shiny version will appeal more to my "public".


And here is the matching necklace:


Hmmm... looks better on a black background doesn't it? I thought with the darker colours that white would be better, but I guess I was wrong, for once! 

Next I'll be making some pendants for a little variety and to offer something in a lower price range. Thanks for looking!


Sunday, March 31, 2013

Handmade Wire Clasps

These are really fun, especially hammering flat some of the wire! I had a chasing hammer, but also invested (! these are cheap) in a nylon hammer just for work hardening. I think that I will also sell handmade clasps at my craft shows. I have a good range of copper wire gauges to practice on, or to use for the final product.


BONUS! Wire Clasp Tutorials:


I am very inspired by Szarka's jewelry. I'll post a few pics so you can see what wonders she works...


Wednesday, February 27, 2013

My Next Show

Thanks to the folks at True Blue Bay Resort for their great promotional work.


I guess I'd better crank up the motivation!